CentOS安装NTP校时
CentOS 7 部署NTP校时服务器
配置参考
提前准备CentOS 7服务器(2C 4G 50G,核心安装即可)
网络时间协议NTP(Network TimeProtocol)是时间同步的技术基础,是用来使计算机时间同步的一种协议。它可以使计算机对其服务器或时钟源做同步化,它可以提供高精准度的时间校正(LAN上与标准间差小于1毫秒,WAN上几十毫秒)
linux的时间分为系统时间和硬件时间。
系统时间:
通常在开机时复制硬件时间,之后独立运行并保存了时间、时区和夏令时设置。通过date命令设置。硬件时间:
(RTC、Real-Time Clock),CMOS时间,在主板上靠电池供电,仅保存时期时间数值。通过hwclock命令设置,在这里,我们用系统时间同步硬件时间:hwclock -w
时间时区设定
当前日期和时间
查看当前系统日期和时间:date
1 | [root@localhost ~]# hostnamectl set-hostname ntp-server |
更改时区
在中国时区是CST,如果显示时区不正确,修改:tzselect
1 | # 输入数字选择 5 9 1 |
拷贝时区
将时区信息拷贝,覆盖原来的时区信息
1 | [root@ntp-server ~]# cp /usr/share/zoneinfo/Asia/Shanghai /etc/localtime |
NTP服务端
安装ntp服务
1 | [root@ntp-server ~]# yum -y install ntp |
更改配置文件
centos7的ntp配置文件存放路径为:/etc/ntp.conf。
restrict 控制相关权限
语法为: restrict IP地址 mask 子网掩码 参数
其中IP地址也可以是default ,default 就是指所有的IP。
配置文件中一般有restrict default语句,注释掉第二种或选择第一种
restrict default nomodify notrap noquery # 默认允许所有可连接客户端ntpdate到本机
restrict default ignore # 默认所有客户端禁止ntpdate到本机
配置与上级互联网服务端连续性同步时间,prefer表示优先,如无可不设置
server 上级ntp服务器IP或者域名 [prefer]
ntp1.aliyun.com 或者 ntp.ntsc.ac.cn
1 | # 第21-24行可以注释掉: 修改为国内公网上的时间服务器(26、27 行);当外部时间不可用时,采用本地时间(28、29行) |
PS: 授权特定网段的主机可以从此时间服务器上查询和同步时间:
1 | restrict 192.168.100.0 mask 255.255.255.0 nomodify notrap |
启动NTP服务
启动NTP服务,并开机自启,同步硬件时间
1 | [root@ntp-server ~]# systemctl restart ntpd && systemctl enable ntpd |
NTP同步时间
设置硬件时间 hwclock -w
或者在/etc/sysconfig/ntpd文件中,添加【SYNC_HWCLOCK=yes】这样,就可以让硬件时间与系统时间一起同步
1 | [root@ntp-server ~]# hwclock -w |
NTP状态
1 | [root@ntp-server ~]# ntpq -p |
防火墙设置
关闭防火墙 或者 放行端口123/udp端口
1 | # 关闭防火墙 |
关闭selinux
1 | [root@ntp-server ~]# setenforce 0 |
使用域名nginx代理转发
1 | [root@localhost nginx]# cat /etc/nginx/nginx.conf |
问题处理
无法自启动问题
ntp已经设置开机自启,但是开机启动并未成功。一般引起这个问题的最为常见的原因是系统上安装了一个与NTP相冲突的工具:chrony
1 | [root@ntp-server ~]# systemctl status ntpd |
查询chrony是否被设置为enabled,并关闭自启
1 | [root@ntp-server ~]# systemctl is-enabled chronyd |
无法提供服务
服务端正常启动但是无法提供服务,timedatectl查询状态
查看系统时间状态时,其中NTP enabled参数的控制指令为:timedatectl set-ntp yes/no 一般不用
在没开启NTP enabled情况下,NTP synchronized参数一般为no,表示还没有进行过时间同步,在时间同步后会由no变为yes。当然,如果使用过ntpdate手工同步过,该参数也会是yes状态
1 | [root@ntp-server ~]# timedatectl |
解决NTP synchronized: no的方法:停掉ntpd, 执行ntpd -gq重新调整时间后,再启动ntpd
1 | [root@ntp-server ~]# systemctl stop ntpd |
等待一会儿后(大概5分钟),NTP synchronized恢复成yes
1 | [root@ntp-server ~]# ntpstat |
NTP客户端
安装ntp服务
ntp和ntpdate任选一个安装,对应不同同步方法。
1 | [root@localhost ~]# yum -y install ntp ntpdate |
同步方法一:ntpd
好处:
- 客户端的ntpd服务始终运行着,定期同步时间,不用我们每次都手动同步或者写定时器
- ntpd服务是慢慢改变时间直至标准时间
配置NTP
先执行hwclock -w,否则如果bios时间和系统时间差异超过了30分钟,就会报错
同步系统时间和bios时间,配置同步NTP地址1
2[root@localhost ~]# hwclock -w
[root@localhost ~]# echo "server 10.11.7.22" >/etc/ntp.conf启动服务
1
2[root@localhost ~]# systemctl restart ntpd
[root@localhost ~]# systemctl enable ntpdntp状态
1
2
3
4
5
6
7
8
9
10
11
12
13[root@localhost ~]# ntpstat
unsynchronised
time server re-starting
polling server every 8 s
# 重启服务以使配置生效,之后大概要等10分钟左右,才会同步成功
[root@localhost ~]# ntpstat
synchronised to NTP server (10.11.7.22) at stratum 4
time correct to within 1122 ms
polling server every 64 s
[root@localhost ~]# ntpq -p
remote refid st t when poll reach delay offset jitter
==============================================================================
10.11.7.22 114.118.7.163 3 u 15 64 1 0.238 -0.647 0.000同步方法二:ntpdate
ntp和ntpdate无法同时运行,所以先关闭方法一 (未使用方法一则忽略)1
[root@localhost ~]# systemctl stop ntpd && systemctl disable ntpd
启动服务
1
[root@localhost ~]# systemctl start ntpdate && systemctl enable ntpdate
同步时间
同步NTP服务端时间 且 让系统时间和硬件时间同步1
2
3[root@localhost ~]# /usr/sbin/ntpdate -u 10.11.7.22
15 Apr 15:53:46 ntpdate[32506]: adjust time server 10.11.7.22 offset 0.004725 sec
[root@localhost ~]# hwclock -w定时任务
ntpdate每次执行完就失效了,可以设置定时器,定时执行。1
2[root@localhost ~]# crontab -e
*/15 * * * * /usr/sbin/ntpdate -u 10.11.7.22 > /dev/null 2>&1; /sbin/hwclock -wChrony客户端
Chrony 是一个开源的自由软件,它能帮助你保持系统时钟与时钟服务器同步,因此让你的时间保持精确。它由两个程序组成,分别是 chronyd 和 chronyc。 - chronyd是一个后台运行的守护进程,用于调整内核中运行的系统时钟和时钟服务器同步。它确定计算机增减时间的比率,并对此进行补偿。
- chronyc提供了一个用户界面,用于监控性能并进行多样化的配置。它可以在chronyd实例控制的计算机上工作,也可以在一台不同的远程计算机上工作。
CentOS8 以后默认不再支持ntp软件包,改用chronyd实现时间服务功能。
wlnmp方式
1 | # 添加wlnmp的yum源 |
chronyd方式
安装chronyd
chronyd在centos8以后里是预安装的,没有安装的话执行以下命令
1 | # 安装 && 开机自启动 |
修改配置文件
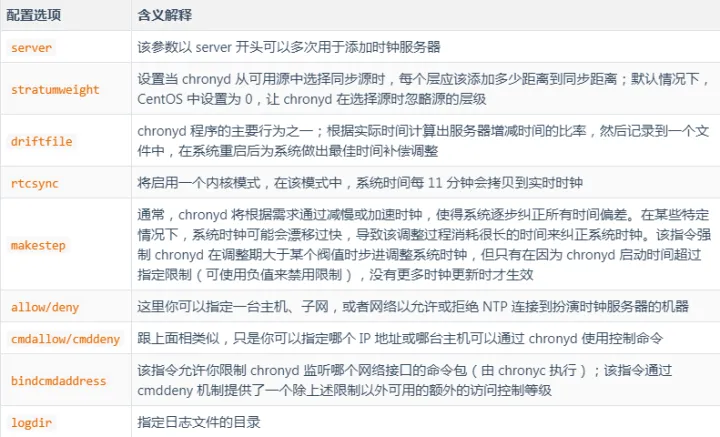
当 Chrony 启动时,它会读取 /etc/chrony.conf 配置文件中的设置,配置内容格式和 ntpd 服务基本相似。
大部分参数并不需要使用,cat /etc/chrony.conf
1 | # 修改对应的 server从10.11.7.22同步时间 allow 允许网段,自身也可以当作服务端 |
运行状态
1 | # 查看chrony是否同步了,使用: |


