文字参考 Docker部署参考 项目地址
oxidized简介 oxidized 是一个网络设备备份系统, 轻量级,可扩展,支持超过90多个操作系统。个人觉得它无与伦比的优势, 同时支持h3c,华为,思科。
config 文件:oxidized 配置文件
Sources 字段:定位 router.db 文件的位置
Outputs 字段 :设备备份文件的存储位置
model 字段:设备厂商所用的系统, 核心功能就是靠这个实现的
router.db文件:被管网络设备详细信息
部署安装 拉取官方镜像 把官方的 oxidized/oxidized 镜像拉下来,有可能会失败,则自己制作镜像
1
2
3
[root@LYGVLTOPOT01 ~] latest: Pulling from oxidized/oxidized toomanyrequests: You have reached your pull rate limit . You may increase the limit by authenticating and upgrading: https://www.docker.com/increase-rate-limit
制作镜像 如果上一步拉取失败,则自己制作镜像
1 2 3 4 git clone https://github.com/ytti/oxidized docker build -q -t oxidized/oxidized:latest oxidized/
启动镜像 1 2 3 4 5 docker run --name oxidized -it -v /etc/localtime:/etc/localtime:ro -v /data/oxidized:/home/oxidized/.config/oxidized -p 8888:8888/tcp -e CONFIG_RELOAD_INTERVAL=3600 --restart unless-stopped -d oxidized/oxidized docker logs -n 50 oxidized docker exec -it oxidized /bin/bash
发现首次会启动失败,提示缺少router.db文件
1 2 3 4 5 6 7 8 9 10 11 12 13 14 15 16 17 18 19 [root@LYGVLTOPOT01 oxidized] *** Running /etc/my_init.d/00_regen_ssh_host_keys.sh... *** Running /etc/my_init.d/10_syslog-ng.init... Aug 12 15:27:45 3d76614d6801 syslog-ng[14]: syslog-ng starting up; version='3.35.1' *** Booting runit daemon... *** Runit started as PID 24 Aug 12 15:27:46 3d76614d6801 cron[30]: (CRON) INFO (pidfile fd = 3) Aug 12 15:27:46 3d76614d6801 cron[30]: (CRON) INFO (Running @reboot jobs ) edit ~/.config/oxidized/config I, [2024-08-12T15:27:48.453778 F, [2024-08-12T15:27:48.456570 no source csv config, edit ~/.config/oxidized/config I, [2024-08-12T15:27:49.751378 I, [2024-08-12T15:27:49.760121 F, [2024-08-12T15:27:49.955537 no output file config, edit ~/.config/oxidized/config I, [2024-08-12T15:27:51.283274 I, [2024-08-12T15:27:51.284005 I, [2024-08-12T15:27:51.481188
基本配置 此处的顺序和config中map调用有关系
1 2 3 4 5 6 7 8 9 10 11 12 13 14 15 16 17 18 19 20 21 22 23 24 25 26 27 28 29 30 31 32 33 34 35 36 37 38 39 40 41 42 43 44 45 46 47 48 49 50 51 52 53 54 55 56 57 58 59 60 [root@LYGVLTOPOT01 ~] YJYHX_255.22:vrp:10.50.255.22:hradmin:Asdf!123 [root@LYGVLTOPOT01 ~] --- username: username password: password model: junos resolve_dns: true interval: 3600 use_syslog: false log : /home/oxidized/.config/oxidized/logs/oxidized.logdebug: false run_once: false threads: 30 use_max_threads: false timeout : 20retries: 3 prompt: !ruby/regexp /^([\w.@-]+[ rest: 0.0.0.0:8888 next_adds_job: false vars: {} groups : {}group_map: {} models: {} pid: "/home/oxidized/.config/oxidized/pid" crash: directory: "/home/oxidized/.config/oxidized/crashes" hostnames: false stats: history_size: 10 input: default: ssh, telnet debug: false ssh: secure: false ftp: passive: true utf8_encoded: true output: default: file file: directory: "/home/oxidized/.config/oxidized/configs" source : default: csv csv: file: "/home/oxidized/.config/oxidized/router.db" delimiter: !ruby/regexp /:/ map: name: 0 model: 1 ip: 2 username: 3 password: 4 gpg: false model_map: juniper: junos cisco: ios
RSA密钥配置 使用密钥rsa验证 首先生成rsa密钥文件 配置参考
1 2 3 ssh-keygen -t rsa -b 4096 -f ~/.ssh/id_rsa.pem cp /root/.ssh/id_rsa.pem /data/oxidized/id_rsa.pem
通用密钥认证
1 2 3 4 5 6 7 8 9 10 11 [root@LYGVLTOPOT01 ~] ······ next_adds_job: false vars: ssh_keys: "/home/oxidized/.config/oxidized/.ssh/id_rsa.pem" groups : {}group_map: {} ······
通用组密钥认证 输出的配置也会按照分组来
1 2 3 4 5 6 7 8 9 10 11 12 13 14 15 16 17 18 19 20 21 22 23 24 25 26 27 28 29 30 31 poeSW_96.9_N021_1:huawei:10.50.96.9:hradmin:Asdf!123:hr_access SuZhou_nmy_Core_255.2:vrp:10.21.255.2:hradmin:Asdf!123:hr_dc ······ groups : hr_dc: vars: ssh_keys: "/home/oxidized/.config/oxidized/.ssh/P3key_rsa.pem" hr_access: vars: ssh_keys: "/home/oxidized/.config/oxidized/.ssh/P4key_rsa.pem" ······ source : default: csv csv: file: "/home/oxidized/.config/oxidized/router.db" delimiter: !ruby/regexp /:/ map: name: 0 model: 1 ip: 2 username: 3 password: 4 group: 5 gpg: false model_map: juniper: junos cisco: ios huawei: vrp
单个节点认证 (不推荐此种方法)
1 2 3 4 5 6 7 8 9 10 11 map: name: 0 model: 1 ip: 2 username: 3 password: 4 vars_map: ssh_keys: 5 YJYHX_255.22:vrp:10.50.255.22:hradmin:Asdf!123:/home/oxidized/.config/oxidized/.ssh/id_rsa.pem
备份文件自动上传 脚本上传 编写脚本,自动上传 安装git
1
2
3
4
5
6
7
8
9
10
11
12
13
14
15
16
17
18
19
20
21
22
23
24
25
26
27
28
29
30
31
32
33
34
yum -y install git cd /data/oxidized/configsgit init git status git remote add origin https://codehub.hengrui.com/qiuf9/oxidized.git git add -A git commit -m "上传" git push -u origin master git config --global credential.helper store [root@LYGVLK8SW09 ~] 0 * * * * cd /opt;./gitpush.sh > gitpush.log 2>&1 cat /opt/gitpush.shsource /etc/profiledt=`date +%Y%m%d_%H%M` echo "Backup Begin Date:" $(date +"%Y-%m-%d %H:%M:%S" )cd /data/oxidized/configsgit add -A git commit -m "Auto commit - $dt " git push -u origin master
oxidized自动上传 备份文件自动上传至gitlab平台 git产生git基础配置,hooks上传使用
1
2
3
4
5
6
7
8
9
10
11
12
13
14
output: default: git file: directory: "/home/oxidized/.config/oxidized/configs" git: single_repo: true user: qiuf9 email: fuqi.qiu.fq9@hengrui.com repo: /home/oxidized/.config/oxidized/configs/configs.git hooks: push_to_remote: type : githubrepo events: [post_store] remote_repo: "https://qiuf9:glpat-bxBEWW7gWnUKxYFcB9KA@codehub.hengrui.com/qiuf9/oxidized.git"
启动oxidized 重启对应的docker镜像名称
问题处理 页面展示问题 页面默认不展示某个字段,每次需要点击按钮选中,很麻烦
1 2 3 4 5 6 7 8 9 docker exec -it oxidized /bin/bash vi /var/lib/gems/3.0.0/gems/oxidized-web-0.13.1/lib/oxidized/web/views/nodes.haml columnDefs: [{ visible: false , targets: 1}]
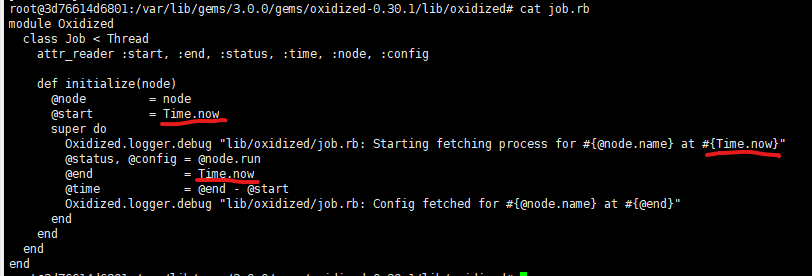
时间问题 docker oxidized时区问题,时间显示不是北京时间 问题原因:ruby语言的时间直接获取的UTC时间,修改完重启镜像
更改Last Update时间
docker exec -it oxidized /bin/bash
vi /var/lib/gems/3.0.0/gems/oxidized-0.30.1/lib/oxidized/job.rb
执行:%s/Time.now.utc/Time.now,把Time.now.utc全部改成Time.now,一共3处
退出容器
重启容器
更改Last Changed时间
docker exec -it oxidized /bin/bash
vi /var/lib/gems/3.0.0/gems/oxidized-0.30.1/lib/oxidized/node/stats.rb
45行左右,把Time.now.utc全部改成Time.now,一共1处
退出容器
重启容器


